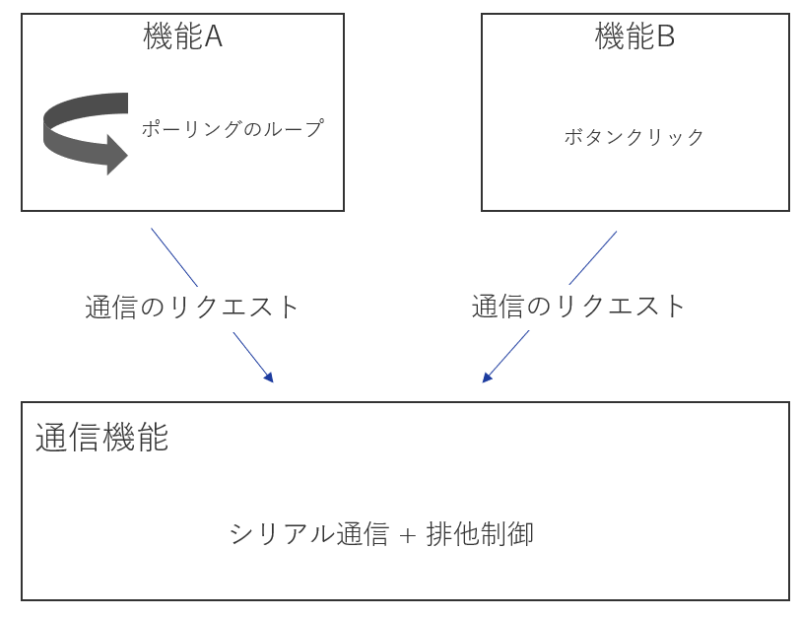
以下の図のようにシリアル通信などで定期的なモニタ処理を行っているときに、別の機能クラスからシリアル通信の送受信を行いたい場合がよくあると思います。この場合はモニタの通信中に他スレッドから通信処理が行われるのを防ぐために排他制御が必要になります。
今回はC#の排他制御で使われる機能のひとつであるSemaphoreSlimを使用したサンプルコードを作成しました。
SemaphoreSlimとは
awaitを含むコードをロックするにはSemaphoreSlimが必要みたいです。SemaphoreSlimは同時に動くスレッド数を制限するために使用されます。(今回作成するサンプルコードではスレッド数はひとつ)
SemaphoreSlimの使い方
第1引数が初期値、第2引数が最大値です。排他制御をする箇所で次のように書きます。WaitAsync() の箇所でセマフォが待ち状態に入り、Release()でセマフォをリリースします。
SemaphoreSlim mutex = new SemaphoreSlim(1, 1);
await mutex.WaitAsync();  // 非同期
//
// 何かしらの処理
//
mutex.Release();
クラス図
作成したセマフォのサンプルコードのクラス図は以下になります。
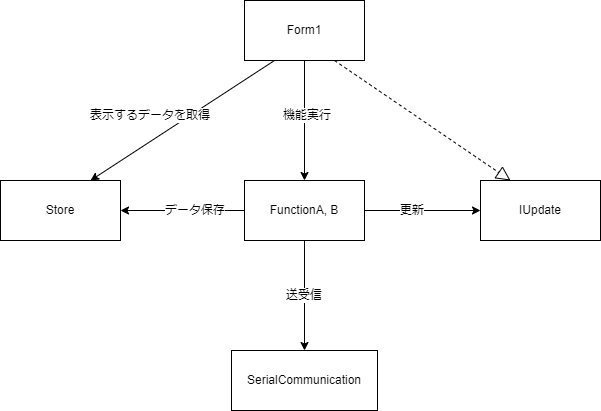
機能Aや機能Bが通信を行う場合はシリアル通信クラスにリクエストを行います。機能Aがモニタを模したポーリング処理、機能Bがボタンクリックにより通信をリクエストします。
シリアル通信クラスには排他機能を設けることによって、機能Aと機能Bの処理を順番に捌くことができるようにしています。
// Form1.cs
namespace sampleform
{
    public partial class Form1 : Form, IUpdate
    {
        FunctionA funcA;
        FunctionB funcB;
        Store store;
        TaskScheduler scheduler;

        public Form1()
        {
            InitializeComponent();
            store = new Store();
            var serial = new SerialCommunication();
            this.funcA = new FunctionA(serial, store, this);
            this.funcB = new FunctionB(serial, store, this);

            this.button1.Text = "Start";
            this.button2.Text = "Execute";
            this.button3.Text = "Stop";
            scheduler = TaskScheduler.FromCurrentSynchronizationContext();

        }

        public void UpdateView()
        {
            this.textBox1.Text = store.A;
            this.textBox2.Text = store.B;
        }

        private async void button1_Click(object sender, EventArgs e)
        {
            this.button1.Text = "Stop";
            button1.Enabled = false;
            await funcA.Start().ContinueWith(x =>
            {
                this.button1.Text = "Start";
            }, this.scheduler);
        }

        private async void button2_Click(object sender, EventArgs e)
        {
            this.button2.Enabled = false;

            await funcB.Execute();

            this.button2.Enabled = true;
        }

        private void button3_Click(object sender, EventArgs e)
        {
            funcA.Stop();
            button1.Enabled = true;
        }
    }
}
// Store.cs
namespace sampleform
{
internal class Store
{
public string A { get; set; } = "";
public string B { get; set; } = "";
public bool CancelRequested { get; set; } = false;
}
}// FunctionA.cs
namespace sampleform
{
internal class FunctionA
{
private SerialCommunication serial;
private readonly Store store;
private readonly IUpdate update;
public FunctionA(SerialCommunication serial, Store store, IUpdate update)
{
this.serial = serial;
this.store = store;
this.update = update;
}
public async Task Start()
{
store.CancelRequested = false;
while (store.CancelRequested == false)
{
var result = await serial.SendReceiveAsync(nameof(FunctionA));
store.A = result;
store.B = result;
update.UpdateView();
await Task.Delay(100);
}
}
internal void Stop()
{
store.CancelRequested = true;
}
}
}
// FunctionB.cs
namespace sampleform
{
    internal class FunctionB
    {
        private SerialCommunication ser;
        private readonly Store store;
        private readonly IUpdate updatable;

        public FunctionB(SerialCommunication ser, Store store, IUpdate updatable)
        {
            this.ser = ser;
            this.store = store;
            this.updatable = updatable;
        }

        public async Task Execute()
        {
            var result = await ser.SendReceiveAsync(nameof(FunctionB));

            store.B = result;

            updatable.UpdateView();
        }
    }
}
// IUpdate.cs
namespace sampleform
{
internal interface IUpdate
{
void UpdateView();
}
}// SerialCommunication.cs
using System.Diagnostics;
namespace sampleform
{
/// <summary>
/// シリアル通信を模したクラス
/// </summary>
internal class SerialCommunication
{
SemaphoreSlim mutex = new SemaphoreSlim(1, 1);
public async Task<string> SendReceiveAsync(string data)
{
try
{
await mutex.WaitAsync();
Debug.WriteLine("Lock");
Debug.WriteLine(data);
await Task.Delay(30);
return DateTime.Now.Millisecond.ToString();
}
catch
{
return "Error";
}
finally
{
Debug.WriteLine("UnLock");
mutex.Release();
}
}
}
}
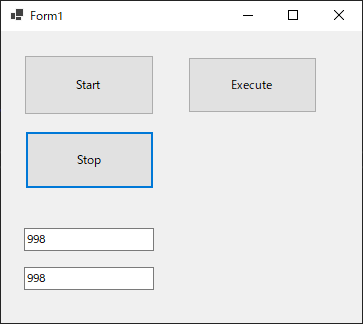
サンプルコードの画面
Windows Formsでテキトーに画面を作成します。”Start”ボタンを押すと、定期周期のFunctionAの通信リクエストを開始してテキストボックスの値を更新。”Execute”ボタンを押すと、FunctionBの通信リクエストを1回だけ実行します。
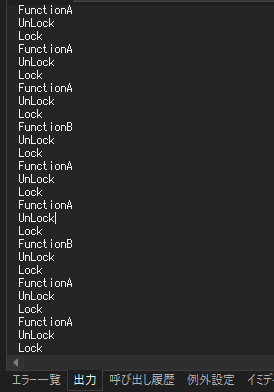
実行結果
実行してログを確認。複数機能から同時に通信リクエストをうけても捌くことが出来ています。